Installing Openshift CDK on my newly re-installed MacBook Pro
Intro and a brief History
Recently I decided to re-install my 2012 Macbook pro. I got this laptop when I first started at Red Hat about 4 and a half years ago. During that time, I’ve had a lot of different things for development installed on it.
I had thought about this for a while, but didn’t want to go through the process of setting things again. I had recently installed the Openshift CDK and had a succesfully running Helloworld-MSA demo, so i didn’t really want to mess with that.
But then one day i was playing around with and trying to run the tests for our Source-to-image(s2i) repo, and i was getting a failure becuase of a command that wasn’t installed called Docker Squash.
Not really a big deal, so i followed the install instructions, and i thought i had installed it correctly(it used python), but i was still getting failures. As it turns out, i had multiple versions of Python installed.
Unrelated to this, in the past i’ve also had major issues with Ruby becuase of the same thing.
This was excuse i needed to start fresh.
I know what you’re thinking, i could’ve spent some time and figured it out, but i’m also the person who bought a new car becuase i needed to get new brakes. In that case it actually worked in my favor since i sold the new car a year later, but thats a different story.
Now, I’m not going to go into how to setup a bootable USB with the latest macOS since you can just google that.
Next Steps
Once I was back up and running(After first login), my main focus was getting that Openshift VM back up and running since i was focusing on the Node.js microservice.
There is a Prepare Environment section for setting up the demo, so that is were i started.
OC Client
First thing i needed was the Openshift Client(OC cli), which i could just download from github. But for that to work, it needed to be on my PATH, and it was at this point, that i realized i needed to go download iTerm and setup oh-my-zsh and git(which is part of the xcode command line tools).
So after i got my terminal back to my old configuration(This time i had a very very minimal ~/.zshrc file), I downloaded the OC client, and setup up my PATH.
Running oc version gave me something similar
oc v1.4.1+3f9807a
kubernetes v1.4.0+776c994
features: Basic-Auth
Hypervisor
Now that i had my OC client working, I moved on to the next part, which was to use “Option 1 - Use CDK”. This requires me to use a Hypervisor(something about this word really annoys me, btw). So since I’m on a Mac and it’s free, i chose VirtualBox.
So i go over to the virtual box site and download the latest version, which at the time of this writing is 5.1.4, and install that. Simple stuff, just follow the bouncing ball to install.
Vagrant
The next bullet point in the instructions says i need vagrant. Simple enough, so i go to the vagrant site and download the vatest version which was 1.9.1 . Again, following the bouncing ball the install.
CDK
Next up, it was time to download the CDK, which is really 2 downloads, the Red Hat Container Tools(i downloaded 2.3.0) and the RHEL Vagrant Box(i downloaded the virtual box image, for obvious reasons)
Once that was all downloaded and unzipped, I followed along to install the vagrant plugins that were needed. A simple copy and paste of:
vagrant plugin install vagrant-service-manager vagrant-registration vagrant-sshfs
And then adding in that RHEL vagrant box. Another copy/paste
vagrant box add --name cdkv2 <path to downloaded .box file>
Of course i made sure i also increased the VM_MEMORY to 6000.
The directions also say to export a SUB_USERNAME and SUB_PASSWORD which are my Red Hat Developer user/password.(Also needed for downloading the CDK, probably forgot to mention that).
Now finally i execute vagrant up
And…. I got something sort of unexpected:
~/develop/openshift-cdk/cdk/components/rhel/rhel-ose » vagrant up                                                            lucasholmquist@BadMotherfucker
Bringing machine 'default' up with 'virtualbox' provider...
There are errors in the configuration of this machine. Please fix
the following errors and try again:

VagrantPlugins::Registration::Config:
* The following settings shouldn't exist: password, username
Interesting, so i removed those exports i did for SUB_USERNAME and SUB_PASSWORD. I could just enter them in when prompted, probably.
So after getting rid of those exports, i again run vagrant up and after a little while of boot up, i get the “Success” screen.
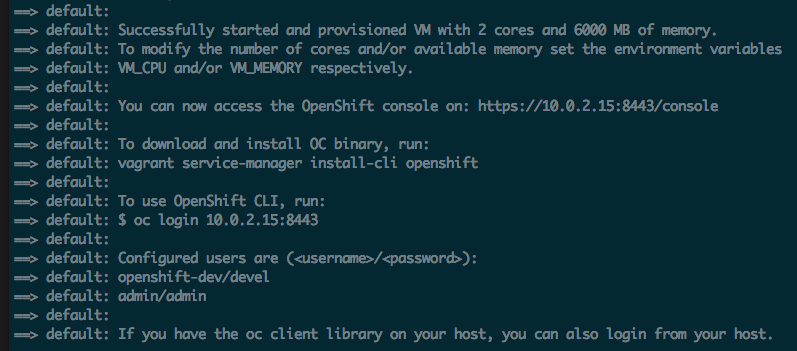
But i noticed something. The docs say to now go to https://10.1.2.2:8443/console/ for the Openshift Console. But, according to this log, i should go to https://10.0.2.15:8443/console/
So i decided to go to both addresses, but neither one loaded.
Before I did the re-install of the laptop, i had this working, following the same steps, so why wasn’t this working now.
My first instinct was, maybe i should try the CDK 2.2 version instead, so i did. But that gave me the same result. I actually got some more “Vagrant Plugin settings shouldn’t exist errors” like last time. So that couldn’t be it.
Solution
After some googling, I somehow stumbled upon the Installation Guide for the CDK, https://access.redhat.com/documentation/en/red-hat-container-development-kit/2.3/paged/installation-guide/. So i navigated to the chapter on installing for MacOS.
This is when i got to the section on “Additional Software”, as i already knew, i needed to install Virtual Box, but there was an “Important” box.

You may remember from early in this post, i downloaded the latest version of Virtual Box, which is not the version we need.
So I downloaded this lower verion and installed that.
And then i also saw something else.
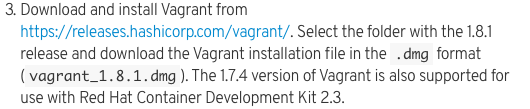
My Vagrant version was also wrong.
So i downloaded the “Correct” version and installed it. Then i went through the steps from earlier with installing the vagrant plugins. I think i first removed the plugins before i installed the correct version of vagrant then re-installed the plugins, but i can’t be certain.
I might have also removed the RHEL vagrant box and re-did that add step too.
Now, this time when i did vagrant up, and got success screen, the console link was what i was expecting. And when i clicked on it. I got the console i was looking for.
At this point i continued with installing each microservice individually(Which is Option 2 in the docs) to get everything back to where i was.
One more thing
So, I was also really hoping that i wouldn’t have to install Java, since I’m a node.js dev, and i thought i could get away with it, but as soon as i got to this command for deploying the Hola project I realized i needed it.
Although, at first, i thought maybe i wouldn’t need it and all the “mvn package -ing” would happen on the “server” side. The Node.js microservice does this actually, it runs npm install as part of building the docker image on Openshift. Perhaps this would too. Nope.
Summary
So in summary, make sure you have Virtual Box 5.0.x and Vagrant 1.8.1